
Author Bio
Michael Chen is a Senior Electrical Engineer and Technical Consultant with over 18 years of experience in low-voltage power distribution and switchgear systems. He holds a Master’s degree in Electrical Power Engineering from the University of Manchester and is a certified member of the Institution of Engineering and Technology (MIET). Michael has designed over 500 distribution board layouts for commercial, industrial, and residential projects across Europe, Asia, and North America. He regularly conducts technical training for facility managers and electrical contractors, specializing in IEC 61439 compliance and enclosure thermal management. His work has been featured in Electrical Engineering Magazine and he holds two patents related to modular busbar systems.
Introduction
Understanding distribution board dimensions is crucial for any electrical project. The physical size determines where and how the board can be installed. It also dictates how many circuits you can accommodate safely. Many installers face costly site issues due to incorrect sizing. This guide provides precise dimensional data from real-world products. We will explore everything from compact domestic units to large industrial panels. You will learn how to calculate the exact dimensions you need. We will also cover compliance with international standards like IEC 61439. By the end, you will have the knowledge to specify boards with absolute confidence. Let us begin by examining the fundamental components that determine overall size.
Why Physical Dimensions Matter in Distribution Board Selection
The dimensions of a distribution board are not arbitrary numbers. They directly impact the safety and functionality of the installation. Firstly, the enclosure must fit the designated wall space or recess. A board that is too large creates aesthetic and access problems. Conversely, a board that is too small leads to overcrowding and overheating. Overcrowding makes wiring difficult and increases the risk of electrical faults. Proper dimensions ensure adequate space for heat dissipation. They also provide room for fingers and tools during installation and maintenance. Furthermore, dimension constraints affect compliance with wiring regulations. For example, Australian Standard AS/NZS 3000 mandates specific clearances around boards. Therefore, getting the dimensions right from the start is non-negotiable for professional work.
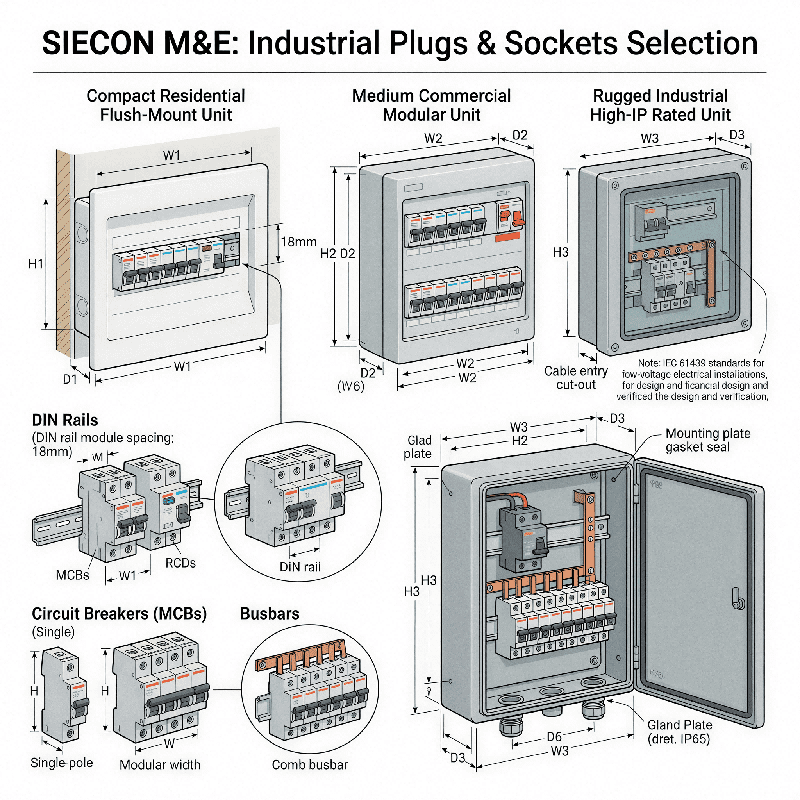
Core Components That Influence Distribution Board Dimensions
To understand sizing, you must first understand the internal components. The width and height are primarily dictated by the internal chassis. This chassis holds the DIN rails and the busbar system. The depth is determined by the components mounted inside. This includes circuit breakers, residual current devices, and contactors. Deeper enclosures are required for devices like surge protectors or meters. For instance, the ABB Protecta Plus series uses a 125mm depth to accommodate various internal kits. Additionally, the type of busbar system affects the internal layout. A 250A busbar requires more physical space than a 100A busbar. The material of the enclosure also plays a role. Metal enclosures, like those from Havells, often have different wall thicknesses than plastic ones. All these factors combine to produce the final external dimensions.
Standard Enclosure Shapes and Their Dimensional Profiles
Most distribution boards share a common rectangular shape. However, the specific width-to-height ratio varies significantly. This variation depends on the number of rows of DIN rails. A single-row board is wide and shallow, ideal for small apartments. The Spelsberg AKe series offers single-row options starting at just 100mm wide. As you add rows, the board becomes taller and more square-like. A two-row board, such as the Gewiss 40 CDE model, balances width and height for medium loads. Four-row boards, like the Psolera Arellos 56-module unit, are tall and relatively narrow. This vertical orientation saves floor space but requires higher wall clearance. Depth remains relatively consistent across rows but changes with IP ratings. Higher ingress protection often means thicker walls and deeper enclosures.
Decoding the Width Dimension: Modular Spacing and DIN Rails
The width of a distribution board is directly tied to “module spacing.” This is the fundamental unit of measurement in electrical distribution. One module (often abbreviated as “mod” or “way”) is typically 18mm wide. This standard allows any brand of breaker to fit any brand of board. Therefore, the internal width is calculated by multiplying the number of modules by 18mm. However, the external width adds the thickness of the enclosure sides. For example, a 24-module board like the MB224C31X15 requires significant internal rail space. You must also account for end-feed units and blanking plates. These take up physical space on the DIN rail. Always verify the “number of modules” specification, not just the external width. A 376mm wide PDL board can hold 60 ways because of efficient internal layout. This shows that internal design is as important as the raw measurement.
Height Dimensions: Planning for Row Capacity and Cable Entry
Height is the dimension most often miscalculated by installers. The height must accommodate the vertical stacking of DIN rail rows. Each row typically requires about 150mm to 175mm of vertical space. This space includes the rail itself and the height of the breakers. It also includes necessary wiring space between rows. Manufacturers like ABB offer multiple height options for the same base model. Their Protecta Plus 4-way board starts at 590mm tall. The 24-way version of that same series extends to 1360mm in height. This significant increase allows for six times the circuit capacity. Additionally, height must account for cable entry zones. Knockouts are usually located at the top and bottom of the enclosure. Sufficient height ensures cables can bend naturally without stress. This prevents damage to insulation and maintains safety.
Depth Dimensions: The Critical Factor for Component Fit
Depth is often the most overlooked dimension, yet it causes the most installation errors. Shallow boards, around 100mm deep, are common for flush-mounting in walls. The PDL flush-mount board has a depth of only 100mm. This allows it to fit within standard wall stud frameworks. However, surface-mount boards can be deeper. The Schneider Acti9 board has a depth of 235mm. This extra depth accommodates a 160A main switch and thicker cables. Deep boards are essential when using AFDDs or communicating meters. These devices protrude further from the DIN rail than standard MCBs. Always check the “Ue” rated operational voltage requirements, as higher voltage components may need more space. Failure to check depth results in the door not closing properly. This violates safety protocols and IP rating integrity.
Case Study: Sizing a 60-Way Commercial Distribution Board
Let us analyze a real-world scenario to apply this knowledge. A commercial office fit-out required a 60-way, three-phase distribution board. The chosen product was the PDL DBS Series surface-mount board. The technical specifications showed external dimensions of 376mm width, 800mm height, and 115mm depth. These dimensions were critical for the builders. The 800mm height meant the board had to be mounted with the top at 1800mm from the floor. This ensured compliance with reachability standards. The 115mm depth confirmed it would not protrude too far into the corridor. The board featured four rows of DIN rails to accommodate the 60 modules. It was made of ABS plastic with an IP40 rating. This rating was suitable for indoor use in a clean office environment. The 100A rating matched the building’s sub-main supply perfectly. This case shows how dimensions tie directly to installation planning.
Case Study: Compact Design for Residential Flush-Mounting
In contrast, consider a high-end residential apartment project. The requirement was for a 30-way board that would be invisible once installed. The solution was the PDL Superboard Series flush-mount model . Its dimensions were 376mm wide, 392mm high, and only 100mm deep. The critical dimension here was the depth. Standard residential walls in this project used 90mm studs. A 100mm deep enclosure required a small packer to be built into the wall. The cut-out dimensions were even more critical at 335mm x 357mm. The electricians used these figures to create a precise opening in the plasterboard. The result was a flush fit with the wall surface. The light grey color and gloss finish blended seamlessly with the decor. This project highlights why you cannot rely solely on external dimensions. You must also consider cut-out and mounting dimensions for a professional finish.
High-IP Rated Enclosur es: How Protection Impacts Size
Environmental protection has a major impact on distribution board dimensions. Boards rated IP65 or IP67 are significantly larger than standard IP40 units. They require thicker gaskets and stronger locking mechanisms. The Gewiss GW40114, with an IP65 rating, has dimensions of 298mm x 420mm x 140mm. This is substantially larger than an equivalent capacity IP40 board. The extra depth provides room for the watertight cable glands. These glands require straight cable entry, which adds to the required height. Psolera offers construction site boards with IP65 and IK08 ratings. These boards measure 662mm x 500mm x 160mm. The increased size provides impact resistance and protects against water jets on site. When selecting outdoor boards, always add a safety margin to the dimensions. This allows for gloved hands and bulkier weatherproofing accessories.
Industrial and Site Distribution Board Dimensions
Temporary worksites and industrial environments demand rugged, large-format boards. These units often come pre-wired with sockets and heavy-duty switches. The Psolera INDUBOX series is a prime example of this category. One model features four Schuko sockets and an emergency stop button. Its external dimensions are 270mm x 500mm x 160mm. Despite being “small” for industrial use, it is quite deep. Another site board with mixed three-phase and single-phase outlets is even larger. It measures 662mm wide, 500mm high, and 160mm deep. The width expands to accommodate multiple rows of protection devices. These boards often feature metal feet and lifting points. This adds to the overall footprint required during storage and use. Always verify the “overall dimensions including handles” for these portable units.
Metal vs. Insulated Enclosures: Dimensional Differences
The choice of material influences the final dimensions of the board. Metal enclosures, like those from ABB and Havells, use folded sheet steel. This material is strong but requires precise bending radii. The thickness is typically 1mm, which adds rigidity without bulk. Metal boards often have a textured powder-coated finish in RAL 7035 grey. On the other hand, insulated plastic enclosures offer Class II protection. They are made from materials like ABS or polycarbonate. Plastic requires thicker walls to achieve the same mechanical strength as metal. Therefore, plastic boards can sometimes be bulkier for the same internal capacity. However, they are lighter and easier to install. The Spelsberg AKe series uses plastic and shows dimensions like 300mm x 750mm x 142mm. Both materials are valid; the choice depends on the application and environment.
Understanding Manufacturer Specification Sheets
Learning to read a manufacturer datasheet is an essential skill. Dimensions are usually listed as Height x Width x Depth. However, the order can vary by region and manufacturer. Always double-check the diagram in the technical data sheet. ABB clearly states their dimensions as “Height x Width x Depth”. They also provide “distance between fixing centres.” This is the measurement for the mounting screws. PDL provides both product dimensions and cut-out dimensions. These are often different, especially for flush-mount products. Look for notes on “Overall dimensions” versus “Enclosure dimensions.” Handles, hinges, and knockouts can add to the overall size. Never order a board based on the part number alone. Verify the dimensional drawing matches your site constraints.
The Importance of Thermal Management in Dimensional Planning
Size is not just about fitting breakers; it is about managing heat. Electrical devices generate heat, especially when operating near capacity. The enclosure dimensions must allow for natural convection. This is why taller boards often perform better thermally. They create a chimney effect, drawing cool air in from the bottom. Psolera provides thermal dissipation data for their enclosures. Their 56-module board can dissipate up to 109 Watts of power. If you cram too many circuits into a small box, the heat builds up. This causes breakers to trip unnecessarily or even fail. In some cases, you may need to upsize the enclosure for thermal reasons. This is true even if the internal components fit in a smaller space. Always consider de-rating factors based on the volume of the enclosure.
International Standards Governing Enclosure Dimensions
Distribution board dimensions are governed by strict international standards. The primary standard for low-voltage switchgear is IEC 61439. Part 1 and Part 2 cover general rules and power switchgear. Part 3 specifically covers distribution boards intended for operation by ordinary persons. Compliance with these standards ensures basic safety and performance. Manufacturers like ABB and Havells proudly state their compliance. Havells boards comply with IEC 61439-3, IS:13032, and IS:8623. In Germany, boards often comply with DIN VDE 0603-1. These standards define dimensional requirements for things like busbar spacing. They also ensure that safety distances are maintained inside the enclosure. When you select a compliant board, you are buying a guarantee of minimum dimensional integrity.
Calculating Space for Future Expansion
A common mistake in project planning is failing to allow for expansion. The distribution board you install today must serve the building for decades. Therefore, selecting a board with spare way capacity is wise. This means choosing a larger physical enclosure than currently needed. The extra internal space provides room for additional circuits later. It also makes wiring easier during the initial installation. A spacious board is a pleasure to terminate wires in. A cramped board invites errors and damaged insulation. When reviewing dimensions, consider the “maximum number of ways” versus the “populated ways.” The 60-way PDL board offers immense scope for future growth. Investing in a slightly larger board now saves thousands in labor later.
Installation Clearances and Working Space Requirements
Once you have the board dimensions, you must plan the surrounding space. Electrical codes mandate specific clearances in front of all electrical panels. In many jurisdictions, you need at least 1 meter of clear working space. The width of this space should equal the width of the board or more. This allows a person to stand safely while working on live parts. The height of the working space must cover the full height of the board. Additionally, consider the door swing. The board door must open to at least 90 degrees, often 180 degrees. A door that cannot open fully blocks access to breakers. Always measure the area before the board arrives on site. It is a simple step that prevents major headaches during final inspection.
Conclusion: Mastering Distribution Board Dimensions
Mastering distribution board dimensions separates professional installers from amateurs. It requires understanding modular counts, row configurations, and depth requirements. We have explored how different applications demand different sizes. A 60-way commercial board is a tall, robust piece of equipment. A 30-way residential board is shallow and designed to hide in a wall. An IP65 industrial board is bulky and built to withstand the elements. Always cross-reference the manufacturer”s height, width, and depth data. Verify the cut-out dimensions before cutting into any wall. Plan for thermal management and future expansion needs. By following these guidelines, you ensure a safe, compliant, and professional installation every time.
Frequently Asked Questions
Q: What is the standard width of a single module on a DIN rail?
A: The standard width for a single module (1 way) on a DIN rail is 18mm. This is an industry-standard measurement that ensures compatibility between different manufacturers” components.
Q: How do I calculate the internal width needed for 24 circuits?
A: Multiply the number of circuits (24) by 18mm. This gives you 432mm of internal rail space required. You must then add clearance for end plates and wiring to determine the minimum enclosure width.
Q: What is the difference between flush-mount and surface-mount dimensions?
A: Flush-mount boards, like the PDLDBF30, are designed to sit inside the wall cavity. They are shallower (around 100mm deep) and require specific cut-out dimensions. Surface-mount boards sit on the wall and are often deeper, accommodating larger components.
Q: Can I replace an old board with a newer model of the same dimensions?
A: Not always. Technology and standards change. While the external dimensions might be similar, the internal layout and fixing centers may differ. Always take detailed measurements of the existing space and compare them to the new product”s technical datasheet.
Q: How does the IP rating affect the physical size of the enclosure?
A: Higher IP ratings (like IP65 or IP67) require thicker walls, better seals, and more robust locking systems. This generally results in a larger and deeper enclosure compared to a standard IP40 indoor board with the same internal capacity.